EXIF file metadata is data that is embedded in the file properties, and not seen by most users; examples of metadata are the camera settings eg flash, focal length etc. On land, embedding GPS metadata is fairly straightforward, as many cameras have a GPS function already built in, however for underwater images, we need to use some software to achieve the same results.
GPS encoding (or “geotagging”) has numerous benefits, since third party programs can access this info and use the data for visualisation, mapping, GIS calculations etc. After searching around the net, we found two programs that we think could be very useful for the data hungry marine scientist. We took photos above water on a trip around Sydney Harbour to test the two programs out.
Geotag
The first program we used is GeoTag (Andreas Schneider), an application which is really straight forward to use, and makes use of a few other bundled programs running together seamlessly. The basic idea is that you collect your photos, while also collecting GPS data to be matched up at the end of the field work.
For this example we used a GoPro set to take a photo continuously every 5 seconds, however any interval would work, and it will also work if you are just selectively taking a picture (i.e. not on a regular schedule).
At the start of the day, set your GoPro time to approximate “real time”. Note that you can’t set the seconds, which is why you need to make sure you take a photo of the GPS unit with the time displayed as hh:mm:ss (Figure 1). This step is important later for determining the exact time a photo was taken. Next, be sure that your GPS is set to record the track file; we use a Garmin had held unit, set to record at 1 second intervals. You can now commence your field work and start taking photos.
Figure 1 Taking a photo of "real time" allows calculation of exact image capture time
At the end of your campaign, you download all your photos to a directory on your computer. You then download the GPX file from your GPS device, and save that in a similar directory to your photos. It’s a good idea to make a copy of all the original images in a separate folder, prior to running through Geotag, as it is tricky getting rid of EXIF data once it is written.
Once you boot up the Geotag program, the first step is to set the image path (“File>Add images from directory”). You should then see all your images loaded into the program.
Now you need to upload your GPS data, so navigate to “File>Load tracks from file” and select your GPX file.
Then you select the image displaying time on your GPS unit. When you know the time of this image (which likely differs from the “Camera Time” of the image), right click and select “Set time of image”. You can then select the correct date and time for the image, as well as the correct UTC time offset (Figure 2).
Figure 2 Setting image time in the GeoTag program
When you click ok, the program will ask if you want to apply the same time offset to all images, usually you will click “OK”. The camera time for the images won’t change, however, you’ll have now altered all the “GPS Time” fields so they are correctly referenced to “real” time. You can now right click on an image, then “Find locations>for all images” and the program will assign the correct GPS coordinates from the GPX file to the corresponding image (Figure 3).
Figure 3 With image time offset calculated, GeoTag can find GPS positions for all images
Once this is done, your photos will have a permanent record of GPS location, which can be used in any other program that can read EXIF metadata. If you inspect the file properties, you’ll see in the “Details” tab there is now a completed GPS field (Figure 4).
Figure 4 GPS data is now written to the EXIF metadata of each image file
You can then do some other interesting things, like right click on an image, select “Location names>find for all images” to find the local place name, city, country etc. (Figure 5).
Figure 5 GeoTag can also retrieve local city/place names
You can also export the georeferenced images to Google Earth. Figure 6 shows every image taken in the sample image set, correctly georeferenced to it's location. When you click on an icon, you can open the link to see the specific image taken at that location.
Figure 6 Georeferenced image locations displayed in Google Earth
Benthic Photo Survey GUI
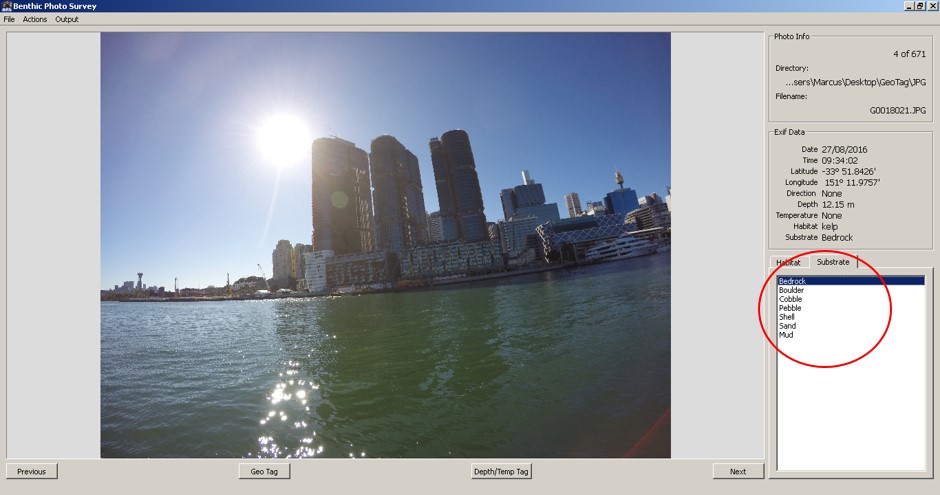
The other program we found useful was BPS (Benthic Photo Survey) GUI (Jared Kibele). This program performs the same core functions as GeoTag (ie calculating GPS position of images) and works in a similar way, so the task of collecting images and GPS data is essentially the same. This program goes one step further however, and allows researchers to assign benthic habitat classifications and coverage percentages to their photos. The habitat and substrate fields are user customisable to add the most relevant categories for the work at hand (Figures 7, 8). Another additional benefit of BPS is that you can export your geotagged and classified photos in a shapefile to be used in a GIS package.
Figure 7 Habitat classification within the BPS GUI program
Figure 8 Substrate classification within the BPS GUI program
Geotagging images using either of these pieces of software is very simple, efficient and can add an extra level of usability to your images, especially for visualization and mapping, as well as making for a more complete archival record of your work.


