After the positive reaction from our "GPS Overlay primer" (https://bit.ly/3buHfO9) we've put together a new paper titled "Four simple, effective methods for live streaming video". The paper covers four inexpensive methods that anyone with a camera and phone/laptop can do, and can easily be adapted to use with one of our tow or drop camera systems. Each method has a description on setup as well as a step-by-step video. You can view the full article below, or download the PDF here. Please feel free to share if you find it useful!
***
With decreasing equipment costs and increasing internet speeds, live streaming video (underwater or otherwise) is becoming a popular tool for researchers and consultants to share and promote their work, as well as assisting collaboration. Here we discuss four methods to help get you online, with the methods broken down into mobile, semi mobile and immobile categories, which reflects the differing hardware required of each method. Most of the methods below are fairly DIY with minimal hardware expenditure, and while there are certainly other methods (for example using dedicated PCs and hosting pages), they are more advanced, costly, and outside the scope of this paper. We will be covering the more advanced methods of live streaming in a future article.
Mobile Streaming Methods
1. GoPro to YouTube/Facebook
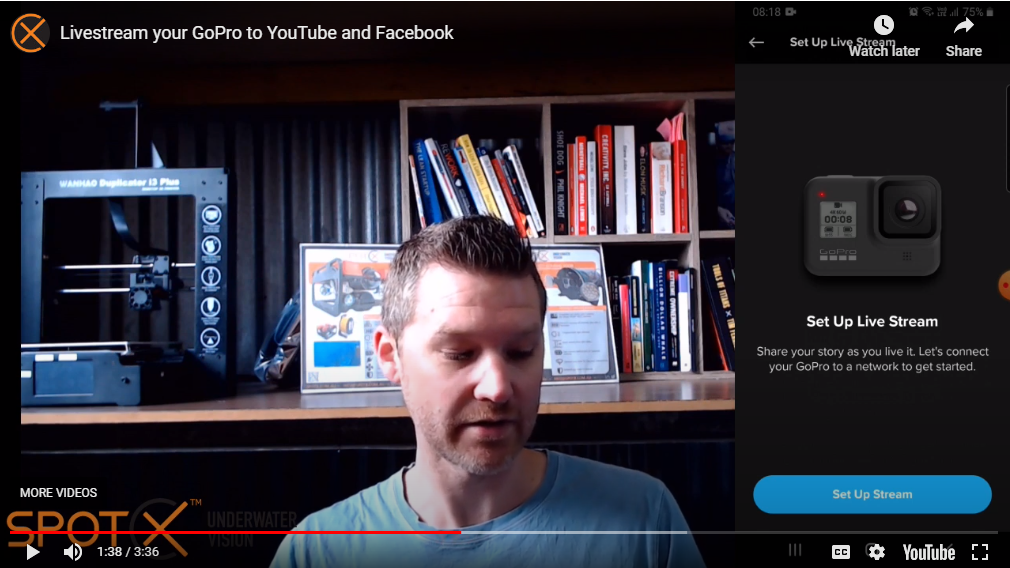
While live streaming directly from your phone is nothing new, using a GoPro (instead of the camera on your phone), with it’s rugged, waterproof build and limitless mounting options, make it a great choice for streaming online, especially in outdoor locations. Using the GoPro app on your phone or tablet makes it easy to live stream your footage directly to Facebook or YouTube (note, mobile live streaming to YouTube is limited to accounts with more than 1000 subscribers). This method is highly mobile, needing just a phone (with data connection) and GoPro, no additional power or network access is required.
Setting up the devices is straight-forward, with the basic outline below; a more detailed video has been put together in the thumbnail link below; there is also more info on the GoPro page here
Ensure your GoPro is already paired/connected to your phone/tablet
Open the GoPro app and select “Go Live” from camera settings
The app will ask for Facebook/YouTube login details and permissions
Choose the name/audience/description/resolution for the live event
Choose the WiFi network (if applicable) and enter password
Click on “Setup Live Stream”, then “Go Live”
Camera LCD should display “LIVE” and you will be able to view the livestream on the chosen platform
Use the comments section to reply/interact with your audience
When you want to finish the livestream, simply click the stop button within the GoPro app
Semi-Mobile Streaming Methods
The following methods require at least a laptop to interface hardware, and so are classed as semi-mobile.
General Streaming Workflow for All Following Methods
For all of the following methods, and for the sake of example, the workflow requires OBS software streaming to YouTube (though you can certainly substitute other platforms if you prefer). To setup this workflow, you will need some info from YouTube, so:
Open your YouTube account and click “Create”>”Go live”
Create a new stream by adding a title, choosing the audience, add a description, choose the category, schedule for later (if required) and declare whether the video is made for kids. Click “OK”
On the left of the screen you should see the stream key, copy it and open OBS
Within OBS, click on “Settings” (bottom right hand of screen)>”Stream” and paste the key over the existing stream key. Select the YouTube/YouTube Gaming option in “Service” and choose Primary YouTube ingest server in “Server”. Click “Apply”>”OK”
Once these settings are in place, and you have a live video source showing in OBS, you can click “Start Streaming” (bottom right hand corner). This will now connect to YouTube to start encoding video for livestreaming, however you are not yet live.
Check in YouTube and you should see a preview of the feed in the top left window. Check the health of the connection (should be “Excellent”) and address any issues flagged. Once you are ready, click the blue “Go Live” button. Your video is now streaming live, and you can interact/reply to comments using the chat bar to the right of screen.
To end the stream, click the red “End stream” button
2. Webcam Converters (lite)
Webcam converters are small USB 3.0 devices which take a HDMI video source (eg GoPro, SLR etc) and convert it to a format recognised by the PC as a camera source. This then allows you to livestream using any standard app that would typically use the webcam on your laptop. There are a number of devices that you can use, we’ve used both the El Gato CamLink and Magewell USB Capture Gen 2, and had good results with both. Below is a basic description of how to setup the livestream, with a detailed video prepared at the thumbnail below. Note, you’ll need a laptop/PC with USB 3.0 port, a YouTube (or other hosting service) account, internet access (mobile hotspot is fine), and free OBS software installed on your machine
Plug in webcam device to the USB 3.0 port of your PC (USB 2.0 is generally supported, but lower bandwidths will affect performance)
Plug in the HDMI source (GoPro, SLR etc) to the web converter and turn the camera on
Open OBS on your PC and navigate to Source (lower left of screen) and click the “+” sign, and click “Add Video Capture Device”
Give the video source a name if required and click “OK”
From the Device drop down menu, select the relevant device. Note, if using the ElGato Cam Link, select “Elgato Game Capture HD” not “CamLink”. You should see your feed showing in the preview window. There are a few settings you can adjust on this page, most aren’t necessary to get started ASAP, however we have found that by enabling buffering, a smoother live stream is produced (though there is some additional lag). Click OK
Follow the steps within General Streaming Workflow for All Following Methods to start live streaming, and be sure to check the Performance Settings for OBS section for any streaming issues

Immobile
This class of streaming has been classed as immobile since the devices require either mains power, or a dedicated PC with significant graphic resources (which could be done on a laptop, but is much more often performed on a desktop PC)
3. Webcam Converters (Full)
There are a number of other more feature-rich webcam converters, which also use the USB 3.0 port, however have a number of other characteristics which can improve your live stream. The Blackmagic Web Presenter takes HDMI or HD-SDI video sources, and converts it to a high quality 720P video feed, suitable for live streaming on the internet. In addition to allowing multiple video formats, there is an optional front panel which can be fit to the device, which acts as a mixer to switch between two video sources. The Web Presenter also actively manages the frame rate of the output, so that in the event of a slow internet connection, the device can reduce the frame rate to maintain a suitable live stream. One great feature of the Web Presenter is the ability to connect an audio source, so that you can overlay music or commentary to your live stream.
In regards to setup, the device is recognised by OBS in the same way as the other USB converters described in 2. Webcam Converters (lite) so simply follow the instructions there. We prepared an overview and example of setup/use case in the thumbnail below.

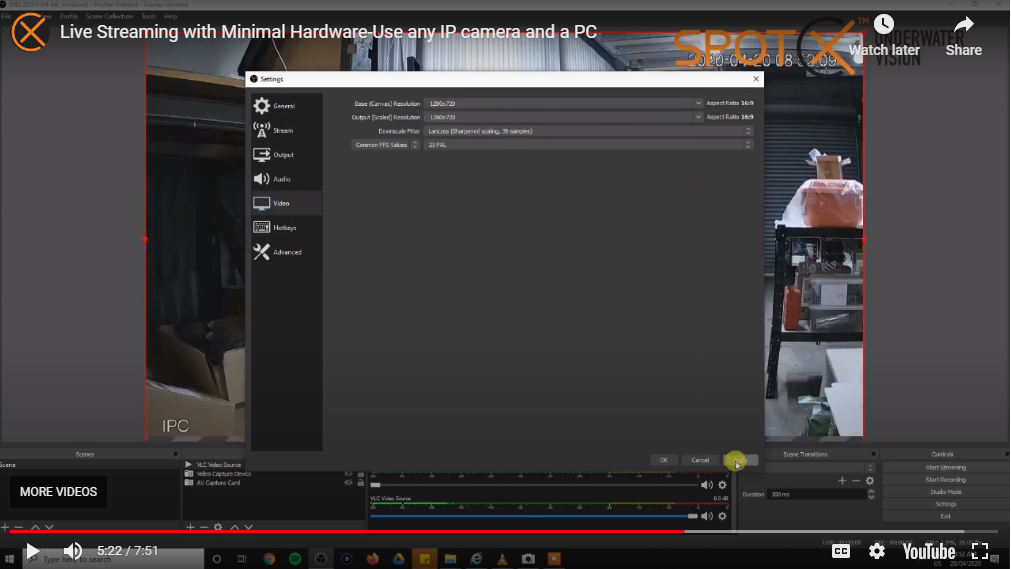
4. RTSP Stream
Using RTSP (Real Time Streaming Protocol) is a convenient way to live stream online, since the only requirement is an IP camera. Most cameras will support an RTSP stream, even if they do not mention it in their specs, but it may take some detective work to find the correct settings. Nevertheless, the method is otherwise a great way to live stream on a budget, as IP cameras can be picked up for less than $100. Note, if you want to avoid having to tinker with the device, it’s best to pay a little more for a well known brand such as Hikvision or Dahua, as they usually have better documentation, and will save you some time during setup. Follow the instructions below to setup an RTSP stream; we’ve also put together a step by step video guide in the thumbnail below.
The basic premise of the RTSP stream is that the camera will live stream to a URL, so instead of adding a video source as we’ve done in OBS previously, this time you are adding a URL source. There are a few extra steps to get started, but well worth the gains in hardware savings. As with all the other methods, we’ve put together a thorough video/explainer at the thumbnail below, otherwise, follow these steps:
First log into your camera (this usually requires using Internet Explorer and downloading an ActiveX plugin)
Go into settings, and change resolution to 720P (this is fine for live streaming, but you can increase this later if required), and change bitrate so that it is less than 2000kbps, save the settings
Open VLC and click Media>Open Network Stream. If you know the RTSP URL of your camera, you can enter it into the address bar, if not, some common formats include:
rtsp://192.168.2.128:554/cam/realmonitor?channel=1&subtype=0&unicast=true&proto=Onvif (replace “192.168.2.128” with your camera’s IP address, but keep the “:554” port component)
rtsp://admin:admin@10.7.6.67:554/cam/realmonitor?channel=1&subtype=1 (replace “admin:admin” with your camera’s username:password)
rtsp://192.168.2.128:554/live (again, replace with your camera’s IP address)
Once you have the correct URL, you should see a preview screen showing in VLC. Copy the URL address you used to your clipboard
Next, open OBS, and in Sources, click the + sign and choose “VLC Video Source”
In the playlist, choose the + sign and paste the RTSP URL you used in VLC. You should then see the camera stream in the OBS preview window, and we can now proceed to setup live streaming as per the General Streaming Workflow for All Following Methods above, and be sure to check out the Performance Settings for OBS section below.
Performance Settings for OBS
There are a number of settings which can be changed within OBS that can have a significant effect on the performance of the live stream (in terms of pixellation, lag etc). Given the wide range of PC specs, it’s not possible to give definitive recommended settings, however the following tips may help you tune the stream to get the best possible feed when using a mid-specced machine, and average network speed
In OBS:
Settings>Output>Output mode>Advanced>Encoder x264 (unless you have an onboard graphics card showing)
Rate Control “CBR”
Bitrate “7000 Kbps”
Keyframe interval “2”
CPU Usage “High”
Profile “High”
Tune “None”
During streaming, check the lower right hand screen in OBS for data on the stream. Ideally the bit rate indicator will remain green, with low or no dropped frames. If you have any of these issues, it is a matter of adjusting settings to get the required live stream. Experimenting with the following may help to improve any issues:
reduce resolution
reduce bitrate
if the CPU load is not above 25% (shown in OBS bottom right status), you can change the CPU Usage Preset (in Output settings) to medium (this will force the PC to dedicate more resources to encoding).
With four new streaming methods demonstrated, there’s now no excuse to not be broadcasting live! If you need advice on hardware to deploy underwater live streaming cameras, Spot X has a number of options, including our stock product, the GoPro enabled Squid Cast, but we also fabricate a range of custom solutions to suit your particular needs. Please don’t hesitate to get in touch for any assistance.